WP Legends Live Panel on March 11th: The Line Between Good and Great Agencies
WP Legends Live Panel on March 11th:
Configuring WooCommerce Stripe Test Keys
To test WooCommerce checkouts with the official Stripe plugin by Automattic or the Payment Plugins for Stripe WooCommerce plugin by Payment Plugins., you must configure your own Stripe test keys within the WordPress backend before running checkout tests.
CheckView does not provide or use its own Stripe test keys, your site’s unique test keys must be saved in the WooCommerce Stripe settings ahead of time. While your site doesn’t need to remain in Test Mode, these keys must be in place to enable CheckView to simulate payment transactions during test runs.
If the test keys are not properly configured, checkout tests will fail due to incomplete payment setup. CheckView ensures that Stripe test keys are securely and exclusively used during test runs initiated by the CheckView bot, allowing you to validate payment workflows without processing real charges. Below is a guide based on the Official Stripe plugin by Automattic, but a similar workflow can be used for the Payment Plugins for Stripe WooCommerce plugin by Payment Plugins.
Prerequisites to Setup
- Install and Activate the Official Stripe Plugin: Ensure the WooCommerce Stripe Gateway plugin is installed and activated on your WordPress site. You can find it in the WordPress plugin repository.
- Access to Stripe Test Keys: Log in to your Stripe dashboard to retrieve your Publishable Key and Secret Key from the Developers > API Keys section.
Configuring Stripe Test Keys in WordPress
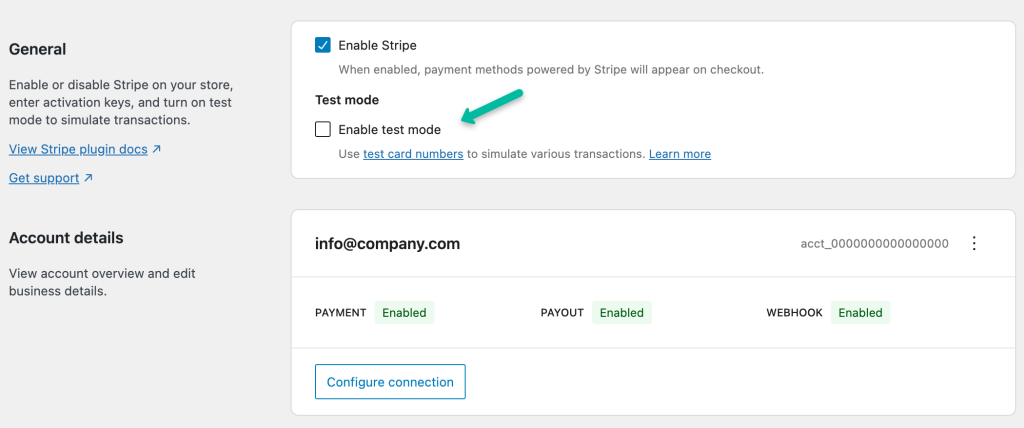
- Enable Test Mode in WooCommerce
Important: Your site will be in test mode during this process so only do this during off hours or a scheduled time!- Log in to your WordPress admin dashboard.
- Go to WooCommerce > Settings > Payments.
- Locate Stripe in the list of available payment methods and click Manage.
- Enable Test Mode by checking the Enable Test Mode box.
- Add Stripe Test Keys
- In the same Stripe Settings page, scroll down to the API Keys section.
- Enter your Test Publishable Key and Test Secret Key:
- Test Publishable Key: Starts with pk_test_.
- Test Secret Key: Starts with sk_test_.
- Save the changes by clicking the Save Changes button at the bottom of the page.
- Pro Tip: Always double-check that you’ve entered the test keys correctly. Using live keys during testing can result in actual charges and disrupt your test flows.
- Verify the Test Configuration
- Go to your site’s checkout page and attempt a test transaction manually.
- Use a Stripe-provided test card number such as 4242 4242 4242 4242 and any expiration and security code to confirm the test keys are working.
- Ensure the payment is processed in test mode and no actual charges are made.
- Disable Test Mode in WooCommerce
- Go to WooCommerce > Settings > Payments > Stripe
- Uncheck the Enable Test Mode box.
- Run a live transaction and ensure your checkout is back in live mode and your credit card is properly processing live transactions.
Pro Tip: If you used Stripe’s automatic connection functionality, you may not need to manually enter your Stripe test keys. However, it’s essential to enable Test Mode during off hours and verify that it functions correctly on your website before running any CheckView checkout test flows. Remember to switch back to Live Mode immediately after completing your manual testing to ensure your site is ready for real transactions!
How CheckView Utilizes Stripe Test Keys
- Secure Usage During Tests: CheckView only uses the Stripe test keys during test runs initiated by the CheckView bot. The bot is verified before initiating any interaction with the Stripe API, ensuring test keys are never used outside of authorized CheckView test flows.
- Full Checkout Workflow Simulation
- With the test keys configured, CheckView can:
- Add products to the cart.
- Proceed through the checkout flow.
- Simulate payment completion with Stripe test cards.
- Verify order placement in WooCommerce.